arrow_back_ios

Main Menu

See All Software See All Instruments See All Transducers See All Vibration Testing Equipment See All Electroacoustics See All Acoustic End-of-Line Test Systems See All Academy See All Resource Center See All Applications See All Industries See All Services See All Support See All Our Business See All Our History See All Global Presence
arrow_back_ios

Main Menu

See All Analysis & Simulation Software See All DAQ Software See All Drivers & API See All Utility See All Vibration Control See All High Precision and Calibration Systems See All DAQ Systems See All S&V Hand-held Devices See All Industrial Electronics See All Power Analyzer See All S&V Signal Conditioner See All Acoustic Transducers See All Current and Voltage Sensors See All Displacement Sensors See All Force Sensors See All Load Cells See All Multi Component Sensors See All Pressure Sensors See All Strain Sensors See All Strain Gauges See All Temperature Sensors See All Tilt Sensors See All Torque Sensors See All Vibration See All Accessories for Vibration Testing Equipment See All Vibration Controllers See All Measurement Exciters See All Modal Exciters See All Power Amplifiers See All LDS Shaker Systems See All Test Solutions See All Actuators See All Combustion Engines See All Durability See All eDrive See All Production Testing Sensors See All Transmission & Gearboxes See All Turbo Charger See All Training Courses See All Acoustics See All Asset & Process Monitoring See All Custom Sensors See All Durability & Fatigue See All Electric Power Testing See All NVH See All Reliability See All Vibration See All Weighing See All Automotive & Ground Transportation See All Calibration See All Installation, Maintenance & Repair See All Support Brüel & Kjær See All Release Notes See All Compliance
arrow_back_ios

Main Menu

See All nCode - Durability and Fatigue Analysis See All ReliaSoft - Reliability Analysis and Management See All API See All Experimental Testing See All Electroacoustics See All Noise Source Identification See All Environmental Noise See All Sound Power and Sound Pressure See All Noise Certification See All Industrial Process Control See All Structural Health Monitoring See All Electrical Devices Testing See All Electrical Systems Testing See All Grid Testing See All High-Voltage Testing See All Vibration Testing with Electrodynamic Shakers See All Structural Dynamics See All Machine Analysis and Diagnostics See All Dynamic Weighing See All Vehicle Electrification See All Calibration Services for Transducers See All Calibration Services for Handheld Instruments See All Calibration Services for Instruments & DAQ See All On-Site Calibration See All Resources See All Software License Management

Tips & Tricks on the Installation of Strain Gauges on Concrete Surfaces

null

The Proper Installation of Strain Gauges on Concrete Surfaces

Installing strain gauges on concrete surfaces does not have to be difficult. Bear in mind three key criteria and the rest will be a cakewalk. Read on to find out what these criteria are and what you have to take into account.

Chosing the Right Strain Gauge

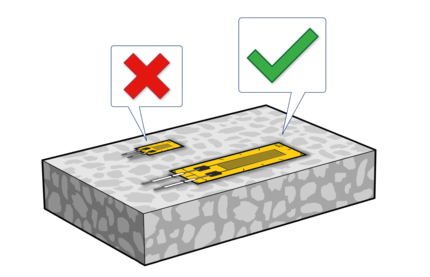
The choice of the right strain gauge depends on the measuring grid length, mainly because it has a decisive impact on the result of the measurement. The strain gauge determines the arithmetic mean of the strain conditions existing under its measuring grid. This factor needs to be taken into account to answer the question regarding the optimum measuring grid length. When a short measuring grid is used to measure the strain on inhomogeneous material such as concrete, partial strains in pebbles or individual sections of the hardened cement paste would be measured. In this case, it is essential to comply with the recommendation to use a measuring grid length five times as long the largest aggregate grain size. Taking this into consideration, HBM provides strain gauges with up to 150mm measuring grid length (for instance HBM 1-LY41-150/120)
null
  • The length of the right strain gauge depends on the underlying material.
  • Concrete is an inhomogeneous material with partial grains and pebbles.
  • Strain gauges that are too short migth measure the pepples instead of the underlying material.
  • Recommendation: use a measuring grid length that is five times as long as the largest grain size.

Which adhesive is particularly suitable?

Concrete requires a strong, pore-filling adhesive that forms reliable bonds even if some amount of residual moisture is still present in the concrete. The superglue X60 produced by HBM has proven its mettle in such situations. Direct bonding of strain gauge with concrete is only recommended for dry parts. If residual moisture is present, it is recommended that a thin aluminum foil be applied first as a barrier layer, and the strain gauge be installed on top of the foil. Zero-point related measurements are only possible on concrete if the sample is completely dry or if the moisture content remains constant during the measurement. Concrete is known to shrink or swell if the moisture content in it undergoes changes. Therefore, why zero-point related measurements are usually only possible over relatively short periods of time, unless an equivalent, unloaded object is available for compensation. The rules for metal installation apply to installations on reinforced concrete. You only need to make sure that the strain gauge is protected accordingly. Special attention needs to be paid to the mechanical protection of the strain gauge to ensure that pouring the concrete will not result in damage to the strain gauge installation.  
null

What must be considered when preparing the measuring point?

The preparation of concrete bonding surfaces is tailored to the use of X60 superglue and is generally simpler than in the case of metal installations. It is necessary to determine whether the concrete was cast with oiled or dry molds. In the case of the former, the oil-soaked layer must be removed with a grindstone. De-greasing with the help of solvents is not recommended, as the solvent and the dissolved oil will only penetrate deeper into the concrete. If dry molds were used, simply remove the concrete laitance until you reach solid concrete. Grinding is also recommended here to obtain as flat a surface as possible. Further, carefully blow off the grinding dust with an air pump or with oil and water-free compressed air. Thoroughly seal the pores with X60 adhesive, filling them completely, not just superficially. Smoothen the bonding areas, do not apply a layer. After approximately 30 minutes, a thin aluminum foil can be applied as a barrier layer or, under certain circumstances, the strain gauge can be attached.

Related Products