Electrical strain gauges are connected to a bridge amplifier module after bonding to their base material with a bridge amplifier module, before starting the strain measurement. The connection between the strain gauge and the wire is usually performed by soldering. The correct soldering of strain gauges with the corresponding connection wires is a process which requests the correct setting of process parameters such as solder temperature, the right equipment, and, of course, some experience. A wrongly processed solder connection could lead for example to a zero-point drift of the measurement signal or to the complete failure of your measurement because of a connection loss.
Lead-Free Soldering of Strain Gauges
Video: Learn How to Solder Strain Gauges
Watch the video for a quick overview of the different soldering steps:
- Removing the oxide layer on the solder pad (using an eraser pencil)
- Cleaning the solder pad to remove eraser residue and other dirt (with RMS)
- Pre-tinning of the solder pads
- Pre-tinning of the wire
- Soldering the wire to the solder pad
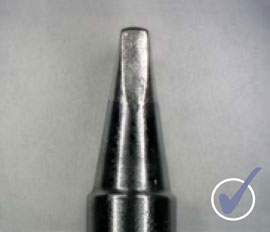
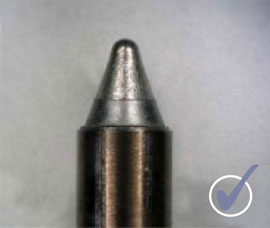
Suitable Soldering Tips for Strain Gauge Installation
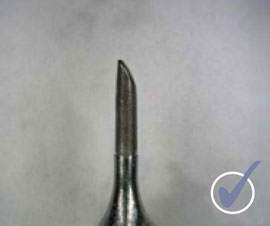
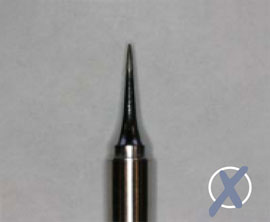
Unsuitable Soldering Tip for Strain Gauge Installation
How to Ensure High Reliability Through Lead-Free Soldering?
- There are a lot of different things to consider when soldering a wire with an electrical strain gauge, such as the solder tip geometry. They must have a suitable thermal capacity, which means that narrow, or spiked, soldering tips are typically unsuitable. Chisel-shaped, rounded, or broader soldering tips are better-suited to lead-free strain gauge soldering.
- Additionally to ensure a correct processing of the solder the temperature of the soldering tip needs to be in a specified range.
- If the temperature of the soldering iron rises above the upper use limit, it could prematurely vaporize the fluxing agent used to prepare the substrate material. This could result in a significantly weakened solder joint. It could also delaminate the strain gauge solder terminal, reducing the adhesion of the components. Conversely, if the temperature is too low the solder may not wet correctly. This necessitates longer soldering times, which can damage the strain gauge soldering terminal and reduce the efficacy of the test equipment. Temperature is also a critical factor in the maintenance of the soldering iron itself. Prolonged use can accelerate the oxidation of the soldering tip, so it is advisable to lower the temperature or switch off the instrument entirely during pauses. Ideally, the soldering time should be as brief as possible, and the solder tip should be re-tinned between uses to prevent surface oxidation.

Strain Gauge Solutions from HBM
At HBM, we are committed to providing unique services and solutions for all your strain gauge applications. With over 65 years’ experience developing and supplying unique test bench accessories and components to sectors all over the world, we are proud to offer you our expertise, services, and products.
If you would like any more information about wiring strain gauges with innovative techniques or accessories, please do not hesitate to contact us.